1. The renewal takes five minutes — until the photo step
Renewing or replacing a driver's licence online is usually painless. Identity check, fee, confirmation. Then the last screen asks you to upload a photo, and that is where most people stall.
The reason is almost always one of three things. You cannot tell which file in your camera roll actually meets the requirement. You have an old passport or CV photo saved somewhere and no idea whether it still qualifies. Or you upload a file, the screen says it does not meet the specification, and nothing tells you which part failed.
Most guidance stops at one line: 35 mm by 45 mm, taken within the last six months. But an upload screen cannot measure millimetres. It measures pixel dimensions, aspect ratio, file format, and file weight. This guide fills that gap. It breaks the requirement into three axes — physical size, pixel size, and file weight — gives you a way to judge whether the photo you already have is usable, and then walks through building a compliant file if it is not.
2. The three axes of a driver's licence photo
A driver's licence photo is an identity-document photo, so it follows essentially the same family of rules as a passport photo. Three things matter.
Physical size. The standard is 35 mm wide by 45 mm tall — the same format most photo studios call a passport photo. The most common mistake here is confusing it with the smaller CV or resume format, which is 30 mm by 40 mm. Five millimetres of height does not look like much, but the aspect ratio is genuinely different. Stretching a 30 × 40 photo to fill a 35 × 45 frame makes the face taller than it should be and pushes the head out of the permitted zone.
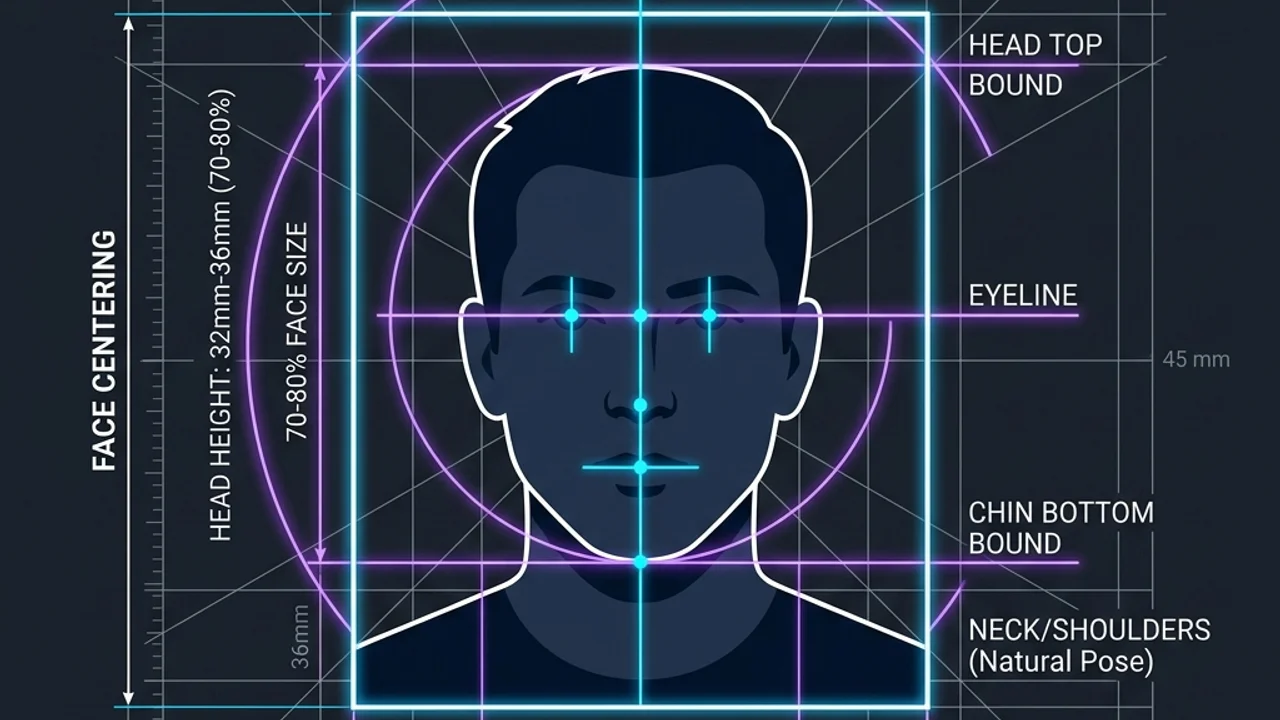
Head proportion. From the crown of the head to the tip of the chin should occupy roughly 70 to 80 per cent of the image height. On a 35 × 45 mm frame that works out to a head length of about 32 to 36 mm. Too small and the face cannot be verified; too large and the top of the head gets cropped. There should still be a little clearance above the crown.
Shooting conditions. The photo must be recent, normally taken within the last six months. No hat or head covering that obscures the outline of the face. Face the camera straight on, head and shoulders in frame, against a plain light background with no pattern. Shadows falling on the backdrop, or light hitting only one side of the face, are frequent rejection reasons. Glasses are usually acceptable, but not if the lenses reflect light, the frames cover the eyes, or the lenses are tinted. One modern addition: turn off any beauty or smoothing filter on your phone camera, because heavily retouched faces are increasingly flagged.
That much appears in every official notice. What follows is the part that actually breaks online submissions.
3. Converting millimetres to pixels — the table upload screens actually use
You can put a ruler against a printed photo. You cannot put one against a file. So upload screens check pixel dimensions instead, and the conversion between the two depends on print resolution, measured in DPI (dots per inch). The formula is simple:
pixels = millimetres ÷ 25.4 × DPI
Applied to a 35 × 45 mm frame:
| Resolution | Width × height in pixels | Where it comes from | Verdict |
|---|---|---|---|
| 96 DPI | 132 × 170 px | Screenshots, web defaults | Far too small; prints as mush |
| 200 DPI | 276 × 354 px | Low-resolution scans | Absolute floor |
| 300 DPI | 413 × 531 px | ID and passport upload standard | The number to aim for |
| 350 DPI | 482 × 620 px | Print-shop quality | Comfortable margin |
| 600 DPI | 827 × 1063 px | Enlargement headroom | File gets heavy for upload |
There is really only one number to memorise: 413 by 531 pixels. It is the de facto standard for identity-document uploads at 300 DPI, and because a licence photo uses the same 35 × 45 mm format, it is the target here too. It helps to convert the head proportion as well: a head length of 32 to 36 mm becomes roughly 378 to 425 pixels at 300 DPI, out of the 531 pixels of image height.
The conversion works in reverse too. Divide your file's pixel dimensions by the DPI and multiply by 25.4 to see how large it really is. A 1200 × 1600 pixel photo is about 102 × 135 mm at 300 DPI — postcard sized, far larger than needed, which is fine because cropping down is lossless in the ways that matter. A 200 × 260 pixel photo, on the other hand, cannot be enlarged into compliance; scaling up invents pixels that were never captured. Shrinking is recoverable, enlarging is not. If the original is small, reshoot it.
4. What else the upload screen checks
Plenty of people get the pixels right and still fail. That is because dimensions are only one of the things being validated. Here are the checks that actually trip submissions, with a safe target for each.
| Check | Safe target | What failure looks like |
|---|---|---|
| Pixel dimensions | 413 × 531 px | Specification warning, cannot continue |
| Aspect ratio | Exactly 7 : 9 | Face looks squashed or stretched in preview |
| File format | JPG (JPEG) | File picks fine, submit button stays inert |
| File weight | Between 100 and 500 KB | Progress bar completes, then fails |
| Colour mode | Colour (RGB) | Greyscale files are rejected outright |
| Background | White or plain light tone | Flagged later during human review |
Standardise on JPG. Photos taken on an iPhone default to HEIC, which many government upload forms simply will not accept, and PNG — while widely supported — produces files two or three times heavier for the same photograph, which pushes you over the weight limit. Checking the format before you upload eliminates a surprising share of failures on its own.
File weight has both a ceiling and a floor. The ceiling is usually stated; the floor rarely is, but it exists. Compress too aggressively and the compression artefacts smear the edges of the face, and automated quality checks catch it. A 413 × 531 JPG saved at roughly quality 80 typically lands between 80 and 200 KB, comfortably clear of both limits.
One caveat: requirements differ slightly between jurisdictions and application portals, and portals get redesigned. Treat the table above as a safe baseline for identity-document uploads, and let any instruction printed on the actual upload screen take precedence.
5. Building a compliant photo in four steps
No studio visit required. Given one decent original, four steps in the browser will get you there. The sticking point in each step is noted, because that is where people give up.
Step one, choose the original. Pick the sharpest photo that satisfies the front-facing, plain-background, taken-recently conditions. Photos received over a messaging app have usually been downscaled and recompressed in transit, so prefer the camera-roll original or the file the studio gave you. The sticking point: telling which file is the original. Open the file info and pick the one whose width exceeds about 1000 pixels.
Step two, crop to the 35 × 45 ratio. Ratio matters more than size at this stage. Crop to 7 : 9 first, then adjust zoom and position until the crown-to-chin distance sits inside the 70 to 80 per cent band. The sticking point: judging that band by eye. Use a tool that draws the guide lines and align to them instead of guessing.
Step three, save at 413 × 531 pixels. A correct ratio with the wrong pixel count still fails validation. Export the crop at the 300 DPI pixel dimensions. The sticking point: assuming that cropping to the right shape also sets the right size. Cropping and resizing are two separate operations.
Step four, check and adjust the weight. If the saved file exceeds the ceiling, lower the export quality in steps — 90, then 85, then 80 — until it fits. The sticking point: reducing the pixel count to save weight. Keep the dimensions locked at 413 × 531 and move only the quality slider; that is how you shed kilobytes without breaking the specification.
6. Can you use the photo you already have?
The most common starting points, and what each one needs.
| What you have | Usable as is? | What to do |
|---|---|---|
| Passport file at 413 × 531 | Usually yes | Just confirm it was taken within six months |
| CV photo at 30 × 40 mm | No, wrong ratio | Re-crop to 7 : 9, then set pixel size |
| High-resolution studio original | Yes, after processing | Crop to ratio, resize to 413 × 531, adjust weight |
| Phone selfie against a plain wall | Conditionally | Disable filters, check pose and shadows, then crop |
| Scan of a printed sheet of several shots | Not directly | Cut out a single frame first, then process |
| Photo received over a messenger app | Usually not | Get the original file and start from that |
| Black-and-white or sepia photo | No | Replace with a colour original |
The rule underneath all of this: ratio and image quality cannot be recovered, while size and file weight can be adjusted at any time. If the original is large, in colour, and front-facing, everything else is a processing problem. If it is small or badly proportioned, reshooting beats repairing.
7. Narrowing down a repeated upload failure
When the same file fails over and over, the symptom points to the cause.
The submit button never activates. This is almost always a format problem — HEIC, WebP, and sometimes PNG are refused outright. Re-save as JPG.
The file uploads but returns a specification warning. Dimensions or ratio are off. Check the pixel size in the file information and match it to 413 × 531 exactly. Rounding during a crop can leave you at 412 × 530, one pixel short, so type the target dimensions in rather than dragging to them.
The progress bar completes and then fails. Usually the weight ceiling. Lower the quality and re-export. Note that an unusually small file, under about 20 KB, can also fail on quality grounds.
The preview shows a squashed face. The image was stretched into the frame rather than cropped to it — typical when a 30 × 40 photo is forced into 35 × 45. Go back to the original and crop to 7 : 9; there is no fix at the stretched file.
The file passed validation but a reviewer asked for a replacement. That is a human check rather than an automated one, and the usual causes are background shadow, glasses reflection, visible retouching, or a photo older than six months.
8. Frequently asked questions
Q1. Are driver's licence and passport photo requirements the same?
The physical format is identical at 35 × 45 mm, and the standard upload size is the same 413 × 531 pixels. The head proportion rule — roughly 70 to 80 per cent of image height — is effectively the same as well. So a passport file taken within the last six months will usually work as is. What can differ is the accepted file format and the weight ceiling on the specific portal, so check those separately before uploading.
Q2. Can I stretch a 30 × 40 mm CV photo to fit?
Not advisable. The two formats have genuinely different aspect ratios, so stretching makes the face vertically elongated and moves the crown-to-chin measurement outside the permitted band. If you still have the digital original, re-crop from it at 7 : 9. If you only have a print, scan it with a generous margin and crop from the scan.
Q3. Can I shoot the photo myself with a phone?
Yes, if you respect the conditions. Use a plain, light, pattern-free wall, face the camera squarely, and stand somewhere the light does not throw a shadow across your face or the backdrop. Turn off any beauty or smoothing filter, and check whether your camera saves selfies mirrored. Holding the phone at arm's length distorts facial proportions, so use a tripod or ask someone to shoot from a little further back.
Q4. Will compressing the file hurt quality enough to get it rejected?
Not if you keep the pixel dimensions fixed and only lower the compression quality. Down to around quality 80 the difference is hard to see by eye while the file gets substantially lighter. The real problem is reducing the pixel count in an attempt to save weight, because that breaks the specification itself and fails at the upload stage. Lock 413 × 531 and move only the quality slider.
9. Making the file in your browser, start to finish
Checking whether your photo meets the specification — and building one that does when it does not — takes three browser tools, used in order.
Open the passport and ID photo resizer, choose the 35 × 45 mm format at 300 DPI, and the 413 × 531 pixel output is calculated for you, with the 70 to 80 per cent crown-to-chin band drawn as a dotted guide. Instead of estimating the head proportion by eye, you align to the line. Background fill and an estimated file weight are on the same screen.
If your crop is already the right shape and only the pixel count is off, use image resize and type 413 and 531 directly. If the exported file lands above the weight ceiling, open image compression and lower the quality while leaving the dimensions untouched. All three run entirely inside the browser, so your photograph is never uploaded to a server.
For the full set of specification rules and rejection reasons, see the passport photo sizing guide. If a weight limit is what is blocking you, compressing an image under 100 KB covers that in detail.